Introduction to Vue.js
Introduction
Vue, pronounced as view is an opensource Model-View-ViewModel frontend JavaScript framework for building user interfaces. It is most often used to build single-page application. It was first released in February 2014 by Evan You. Previous to Vue, he was working on Angular for Google. After he left Google, he made Vue with components he loves about Angular.
Vue is a progressive framework. It means it is easy to integrate with other libraries or existing project. You don’t need to build the whole website around it, although, you CAN, if you want to. Most developer would choose to build single-page application with Vue.
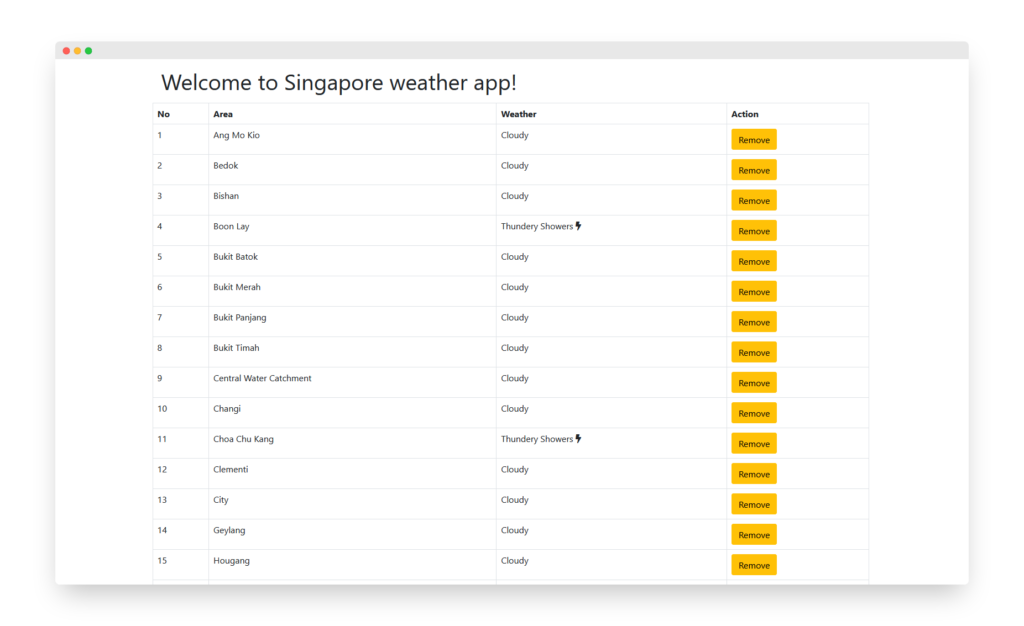
Next, we are going to learn how to use Vue. I will show you how to use vue to build a weather web app that show how is weather like in whole of Singapore. We will explore use of weather API provided by Singapore Government. You should code along with me following this guide.
This guide is intended for student or developers who is fairly knowledgeable on HTML, JavaScript, and CSS. If you are not, I suggest you learn those first before coming back here. Do leave a comment if you are keen to know more, I might write a guide on those too!
You can find the source code in GitHub:
https://github.com/Codemacchiato/learnvue
Demo
https://simplevue.azurewebsites.net/
Basics Part 1
Setting up
Let’s create a new file and named it index.html. We will import Vue.JS with the CDN URL provided by Vue https://cdn.jsdelivr.net/npm/vue@2/dist/vue.js. Your code should look like following:
Our app has imported Vue but it’s still not using it. We create a Vue instance with new Vue(params) .Params is JSON object we will use to configure Vue behavior. You will get to know them as you go through this guide so don’t worry about it.
Using Vue
The first thing Vue need is to know which DOM element it should control. We tell Vue which DOM element by using a selector string in “el” param. Next, we can define our app properties in “data” param. Let’s update our index.html.
Congratulation! You just build your first hello world with Vue. If you run the app now, you should see no difference between now and before. But this time, you instructed Vue to read DOM with “vueapp” ID, and replace {{title}} with title property in data param.
1-way and 2-way binding
What you have just used is 1-way binding. Vue reads title data from JS and apply it into HTML. Any changes in HTML will not update title data in JS.
What if you need JS to reflect changes in HTML? It’s a common requirement when building a form. That’s where 2-way binding comes in. See example code below.
Try to type in the input box. The title will be updated as you type. This is 2-way binding. Vue listen to title data changes and update DOM accordingly.
Using axios
Next, we are going to call weather forecast API provided by Singapore government (https://data.gov.sg/dataset/weather-forecast).
Sample Request
GET https://api.data.gov.sg/v1/environment/2-hour-weather-forecast
Sample Response
Below is simplified response from API. There are more information provided by the API that we will not use here.
{
  "items": [
    {
      "forecasts": [
        {
          "area": "Ang Mo Kio",
          "forecast": "Partly Cloudy (Day)"
        },
        {
          "area": "Bedok",
          "forecast": "Partly Cloudy (Day)"
        }
      ]
    }
  ]
}
We are going to use axios to call the weather api. We use axios because it simplifies the code and it supports promise API. Then we will tabulate the API response.
We will use Bootstrap to make our app a little easier on the eyes.
That’s a lot of changes! We are going to unpack step by step.
Vue methods
methods: {
      getWeatherInfo: function(){
        axios({
          method: "get",
          url: "https://api.data.gov.sg/v1/environment/2-hour-weather-forecast",
          responseType: "application/json"
        }).then(response=> {
          this.weatherData = response.data.items[0].forecasts
        })
      }
    }
We added a new Vue param, methods. This is where we can place our functions for Vue. Functions here can be called by other functions, or triggered by user on-click, or other events.
getWeatherInfo is the first function we have created. This function will call weather forecast 2 hours API and set the response to vue.weatherData. This data will then be accessible by other components in Vue.
Vue lifecycle
created: function() {
  this.getWeatherInfo()
},
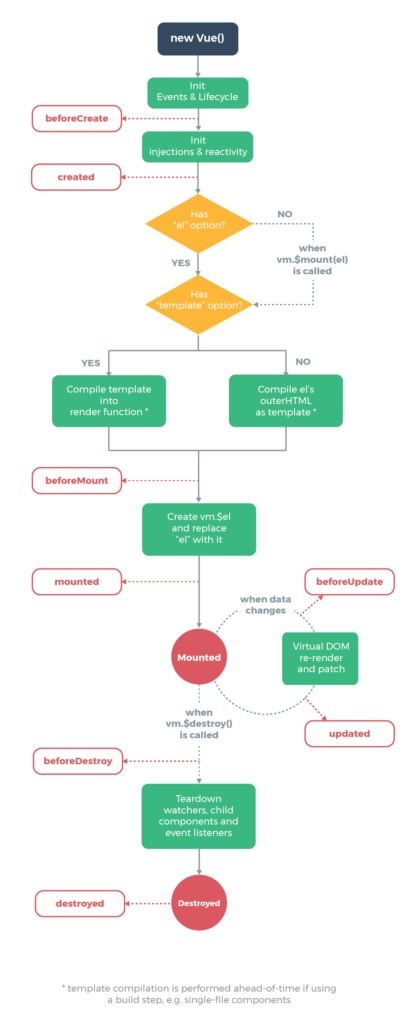
Each Vue instance goes through a series of initialization steps when it’s created – for example, it needs to set up data observation, compile the template, mount the instance to the DOM, and update the DOM when data changes. Along the way, it also runs functions called lifecycle hooks, giving users the opportunity to add their own code at specific stages.
Vue has the following lifecycle:
- beforeCreate
- created
- beforeMount
- mounted
- beforeUpdate
- updated
Vue provides the following diagram to illustrate when lifecycle hooks are triggered.

Source: https://vuejs.org/v2/guide/instance.html#Lifecycle-Diagram
We have hooked a function to created lifecycle. Now when Vue instance is created, it will execute getWeatherInfo().
v-for
<tr v-for="(item, index) in weatherData"
  v-bind:key="item.area">
  <td>{{index + 1}}</td>
  <td>{{item.area}}</td>
  <td>{{item.forecast}}</td>
</tr>
v-for renders an element multiple times based on the source data.
Our code renders each object in weatherData as a table row <tr>, and make the object in weatherData accessible by item variable. We also wants to access the index for numbering in the table.
v-for="item in weatherData" is valid as well if we don’t need to access the index.
v-bind:key="item.area" is not required, but it’s good to provide if the source data is large. Key is the unique identifier of the record, it helps Vue to manage the records efficiently. There might be unexpected result if you modify the source data dynamically but does not provide key.
Basics Part 2
Let’s polish our app further!
Here is what we have done:
- Our app will now highlight the table row in red if that area is raining, with a nice little rain icon in the weather icon. The icon is provided by fontawesome.
- We added an option for users to remove the table row.
v-bind:class
<tr v-for="(item, index) in weatherData"
  v-bind:key="item.area"
  :class="{ 'table-danger' : isDanger(item.forecast) } ">
:class is shorthand for v-bind:class. We can use this to set the class of DOM elements dynamically with any condition. In our code above, we will apply table-danger CSS class to <tr> element if our method isDanger returns true. We pass the value of item.forecast to isDanger method.
We use isDanger method here, but Vue supports other ways as well. You can pass in data.
:class="{ 'table-danger' : isDanger } "
You can bind multiple classes:
:class="{ 'table-danger' : isDanger, 'table-warning' : isWarning } "
You can use an array for fixed value:
:class="[ 'table-danger' , 'table-warning'"
You can use ternary expression in array:
:class="[ isDanger ? 'table-danger' : '', 'table-warning'"
v-if
<i v-if="isShower(item.forecast)" class="fas fa-cloud-showers-heavy"></i>
<i v-else-if="item.forecast === 'Thundery Showers'" class="fas fa-bolt"></i>
Vue supports conditional rendering of an HTML element by condition. The condition can be fixed in the HTML like what we did, in Vue data, Vue method, or others. The syntax for v-if is as follow:
In our app, we use v-if to render rain icon on the condition that the weather forecast is Shower, or thunder icon if the forecast is Thundery Showers.
<div v-if="condition"></div>
<div v-else-if="condition"></div>
<div v-else>
v-else-if and v-else are optional. Note that there is no condition for v-else. V-else is simply true if all other conditions are not met.
Event Handling with v-on
<button type="button" class="btn btn-warning" @click="removeWeather(index)">Remove</button>
We can use v-on directive to listen to DOM events and run some JavaScript when they are triggered. @click is shorthand for v-on:click.
Here, we listen to click event and trigger removeWeather method. Index is passed into removeWeather. In the method, we will remove object in that index of the weatherData array.
v-cloak
If you have been shadowing me and code along. You might have noticed that when the page loads. For less than a second, you will see the HTML page with Vue syntax “Welcome to {{title}}”. It is happening because HTML is loaded before Vue. To solve this issue, we will use v-cloak.
Add v-cloak attribute to div wrapper for heading.
<div class="m-3" v-cloak>
  <h1>Welcome to {{title}}</h1>
</div>
Add [v-cloak] CSS style in <head> and set display to none.
<style>
  [v-cloak] {
    display: none;
  }
</style>
Now, when you refresh the page. You will not see “Welcome to {{title}}” anymore. That is because we now use CSS to hide the heading, and when Vue loads, it will remove the CSS to display the heading.
Transition in Vue
Vue provides various ways to apply transition effects when items are inserted, updated, or removed from DOM. It automatically apply classes for CSS transitions and animations. Next, we are going to apply insert animation to our table.
We have added CSS for .list-enter-active, .list-leave-active, .list-enter, and .list-leave-to.
We added attribute is and name to tbody.
<tbody is="transition-group" name="list" >
We are instructing Vue to apply the transition effect to children of tbody, and the CSS selector name will begin with the name “list”. The CSS selectors we have used follow Vue naming convention .name-class. There are six classes applied for enter/leave transitions.
v-enter: Starting state for enter. Added before element is inserted, removed one frame after element is inserted.v-enter-active: Active state for enter. Applied during the entire entering phase. Added before element is inserted, removed when transition/animation finishes. This class can be used to define the duration, delay and easing curve for the entering transition.v-enter-to: Only available in versions 2.1.8+. Ending state for enter. Added one frame after element is inserted (at the same timev-enteris removed), removed when transition/animation finishes.v-leave: Starting state for leave. Added immediately when a leaving transition is triggered, removed after one frame.v-leave-active: Active state for leave. Applied during the entire leaving phase. Added immediately when leave transition is triggered, removed when the transition/animation finishes. This class can be used to define the duration, delay and easing curve for the leaving transition.v-leave-to: Only available in versions 2.1.8+. Ending state for leave. Added one frame after a leaving transition is triggered (at the same timev-leaveis removed), removed when the transition/animation finishes.
Conclusion
We have completed our Singapore weather app!
We created Vue instance and learned to bind variables on HTML to JS. We learned to store instance variables in the data field, and JS methods in method field. We dive deep into Vue lifecycle and learn how we can use hooks to inject our code into any stage of the lifecycle. We used v-for to loop through an array and render DOM elements. We dynamically apply CSS class to DOM element with v-bind:class. We used v-on to render DOM elements on the condition we specify. Finally, Vue support for transition helps us animate our list enter/leave easily, and beautifully.
You made it to the end! Now you are now equipped with the skills necessary to manage Vue application.
What’s next?
Next, we are going to learn how to use Vue CLI. It is extremely useful if you plan to build an entire web application around Vue. Stay tuned!
Please leave a comment on what you think about this post.


